A website redesign process should start with business goals, user needs, content, and technical requirements rather than visual changes alone. A new interface can look polished and still fail to solve poor navigation, weak messaging, slow performance, low conversions, or difficult content management. A structured redesign gives you a clear path from research to launch. The core website redesign process steps connect discovery, planning, user experience, interface design, development, testing, and post-launch review. Each phase has a specific purpose, and decisions in one phase affect the next.
This guide explains the major phases of website redesign, what you need to prepare, how SEO fits into the work, and how you can manage the project from the first audit to post-launch improvements.
Why should you start a website redesign with a clear problem?
Start with a measurable business problem. “The website looks old” does not define a useful project goal. A stronger goal could involve more qualified leads, clearer service communication, faster page loads, better mobile usability, easier content updates, or stronger search visibility.
Your current website may already contain valuable assets. Some pages may attract organic traffic, generate leads, support key user journeys, or rank for important queries. A redesign should protect those assets while addressing weaknesses.
Ask these questions before you approve a new design:
- What prevents visitors from completing important tasks?
- Which pages produce traffic, leads, sales, or other useful actions?
- Where do users leave the site?
- Which technical limitations affect your team?
- What business goals must the new website support?
- What must stay, change, or disappear?
Clear answers give your team a basis for scope, priorities, and success measures.
What are the main phases of website redesign?
Most professional projects use five connected phases: discovery and audit, UX and wireframing, UI and motion design, development and CMS integration, and quality assurance and launch. A practical project can divide these phases into 7 website redesign steps by separating strategy, SEO protection, and post-launch work.
| Phase | Main focus | Key output |
| Discovery and audit | Business, users, content, data, technology | Audit and project direction |
| Planning and strategy | Sitemap, content, journeys, SEO | Approved structure and migration plan |
| UX and wireframing | Page structure and user paths | Wireframes or prototypes |
| UI and motion design | Visual system and interface | Approved page designs |
| Development and CMS | Frontend, backend, integrations | Working staging website |
| Quality assurance | Function, performance, accessibility | Tested release |
| Launch and review | Deployment and performance checks | Live website and action plan |
Each step of a website redesign affects the next. The sitemap determines which pages the website needs. Those pages determine the content, and the content helps shape each page layout. The final layouts and features then affect how developers build the frontend and configure the CMS. If teams handle these steps separately, changes made later can force them to redo earlier work, which can increase the project’s cost and timeline.
Step 1: Audit the current website
Begin with a detailed audit of the current website. Review business goals, target audiences, website structure, content, analytics, search visibility, technical performance, CMS limits, integrations, and internal workflows. Analytics can show which pages attract traffic, which pages support conversions, and where visitors leave. Search data can reveal pages that hold valuable organic visibility.
Technical checks can expose slow pages, broken links, indexing problems, compatibility issues, or platform constraints. Create 3 practical groups: preserve, change, and remove. Preserve pages and features that work well. Change elements that block users or staff. Remove content or functionality that has no clear purpose. A strong audit prevents a redesign from replacing useful assets without evidence.
Step 2: Plan the sitemap, navigation, and content
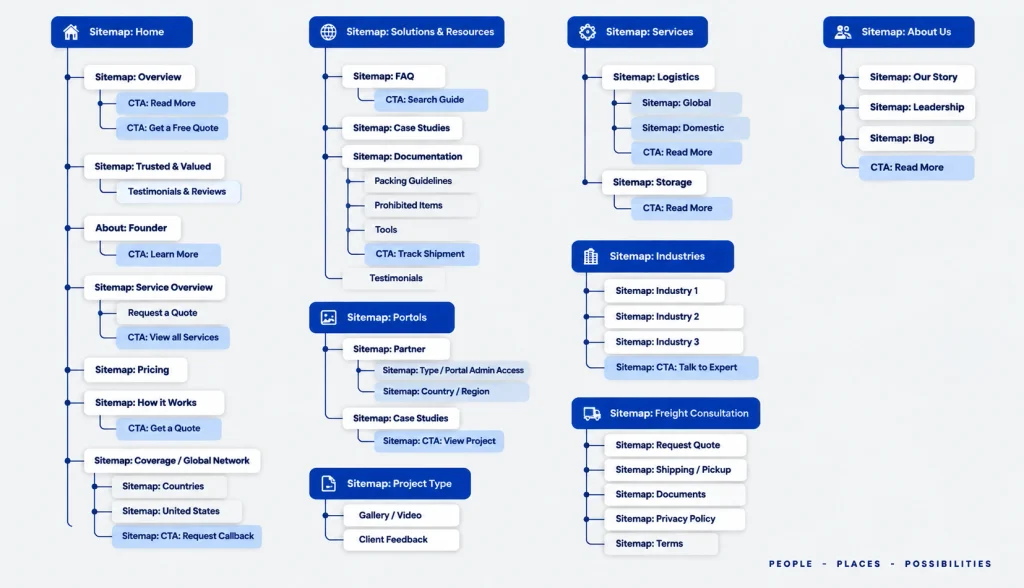
Define the website structure before detailed visual design. Create the sitemap, organize page relationships, set navigation labels, and assign a clear purpose to each important page. Navigation should use labels that visitors can understand without extra explanation. Keep the primary navigation focused on pages that support important user tasks. Place secondary information in suitable areas such as the footer or resource sections.
Content must support the structure. Define the main message, page hierarchy, key benefits, supporting proof, calls to action, and approximate copy volume before detailed design begins.
Real content matters because layout decisions depend on text length, images, headings, product details, and calls to action. Placeholder text can produce layouts that fail once the final copy arrives. A website redesign checklist can help your team track sitemap decisions, content status, page ownership, and approval points before design work moves forward.
Step 3: Protect SEO before the redesign
A redesign can affect search visibility when URLs, navigation, content, internal links, or technical settings change. SEO protection must start before development. List important existing URLs and map each old URL to its correct new destination. Prepare permanent redirects where URLs change. Review metadata, canonical settings, internal links, XML sitemap requirements, indexing controls, and page content.
Protect pages that already earn valuable organic traffic or rankings. Do not remove a high-value page simply because the new structure uses fewer pages. Assess the page’s purpose, search demand, traffic, conversions, and replacement content first.
Content migration also needs care. Preserve useful information, update outdated material, and make sure new pages meet their intended search purpose. A technical SEO review should confirm that the new website can be crawled and indexed correctly. Your migration plan should exist before launch, not after traffic drops.
Step 4: Create UX wireframes and test user journeys
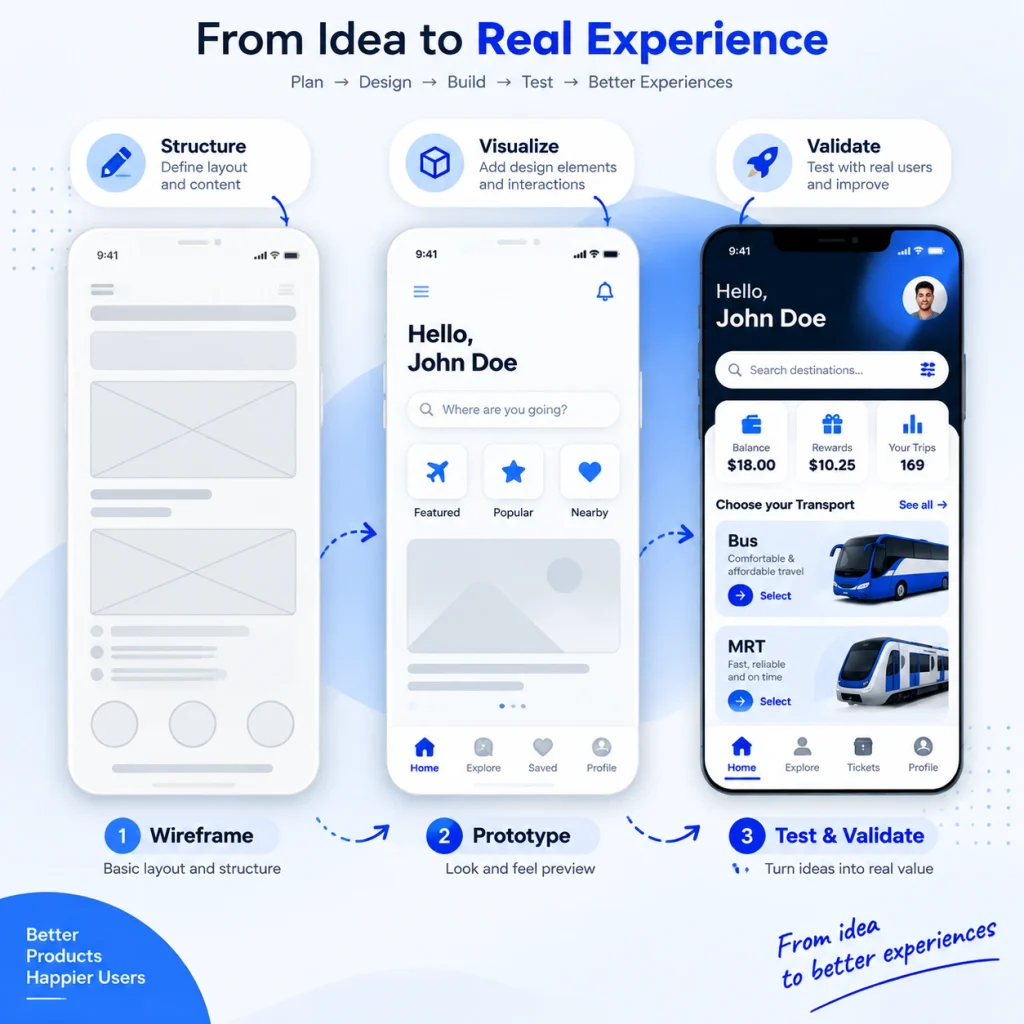
Once the structure and content direction are clear, create wireframes for key pages. Wireframes define information order, page hierarchy, navigation, content placement, calls to action, and conversion paths before visual details take priority. Map important user journeys for each primary audience. A service website may need a short path from a problem statement to a service page and contact action. A SaaS website may need paths for product evaluation, feature comparison, pricing, and account creation.
User research can support more complex redesigns. Define the user problem, research goals, questions, personas, behaviors, needs, and user stories when the project requires deeper UX work. Clickable prototypes can test important journeys before development. Early structural changes cost less than changes to completed interfaces or coded components.
Step 5: Design the UI with real content
After UX approval, create the visual interface. Define typography, colors, imagery, spacing, components, responsive behavior, and brand direction. Start with key pages that contain the most important elements, then apply the approved system to the remaining templates. Design with real headlines, copy, images, and product information whenever possible. Real content exposes layout limits early and reduces major revisions later.
Motion can support attention, product explanation, section continuity, or action feedback. Use animation only when the purpose supports usability and performance. Excessive motion can add technical weight without a clear user benefit. Your design must support accessibility and responsive layouts across relevant screen sizes. The final interface should serve both visitors and the internal team that manages website content.
Step 6: Develop the website and CMS
Development converts approved designs into a functional website. Choose technology according to project requirements rather than trend alone. A small marketing website, multilingual corporate site, SaaS platform, and interactive digital product can require different architectures. Development may include responsive frontend work, backend functions, custom interactions, CMS setup, forms, CRM connections, analytics, localization, site search, content migration, third-party APIs, and deployment infrastructure.
The content management system (CMS) must support daily editorial tasks. Your team should be able to create and update pages without breaking layouts or requiring developer help for routine changes. Depending on technical requirements, a custom project may use frameworks such as Astro or Next.js, animation tools such as GSAP, or a headless CMS such as Strapi. The technology choice should follow the site’s actual needs.
Build the website in a staging environment before public launch. This setup gives your team a controlled place to review content, functionality, integrations, and responsive behavior.
Step 7: Test, launch, and review the new website
Quality assurance must cover the complete website. Test responsive layouts, browsers, navigation, forms, CMS functions, integrations, analytics events, performance, accessibility, metadata, redirects, and indexing settings. Use real content during tests. Long headlines, translated text, unusual image dimensions, missing media, and large content blocks can expose problems that polished design files do not show.
Before launch, verify backups, deployment settings, forms, analytics, redirects, integrations, and critical user journeys. A staged release can reduce risk for a large platform. After deployment, check the production website immediately. Confirm redirects, forms, analytics, indexing, and key paths. Compare post-launch results with the goals defined at the start of the project.
Post-launch review can reveal issues that controlled tests cannot predict. You may see different navigation behavior, unclear page messages, or CMS workflow problems after real users interact with the site. Convert those observations into a prioritized action plan rather than another full redesign..
What should happen after launch?
Launch marks the start of a new measurement cycle. Track the metrics that match your goals, such as qualified leads, conversions, organic visibility, loading performance, user behavior, or CMS efficiency. Review early data, identify high-priority issues, and assign clear actions. Small evidence-based improvements can address real user behavior without forcing another full redesign. Ongoing technical care, content updates, security checks, performance reviews, and issue resolution can support long-term site stability. A Website Maintenance & Support plan can give your team a structured way to manage those needs.
How can you keep the redesign project on track?
Set clear ownership and approval rules before the first design review. One project lead should coordinate feedback, while subject experts can review content, technical requirements, SEO, and compliance within defined stages.
Use a shared project plan with these checkpoints:
- Discovery approval confirms the business goals, audience priorities, audit results, and project scope.
- Structure approval confirms the sitemap, navigation, page objectives, content hierarchy, and major user journeys.
- Design approval confirms the visual system, responsive rules, components, and key page layouts.
- Development approval confirms core functionality, CMS behavior, integrations, and staging content.
- Launch approval confirms quality assurance results, SEO migration tasks, analytics, backups, redirects, and deployment readiness.
Keep feedback specific and tied to project goals. Comments such as “make it better” do not give a designer or developer a clear action. State the problem, affected page, user need, or business requirement instead. Limit scope changes after approval. A new page type, complex integration, or major content restructure can affect design, development, testing, and schedule. Record scope changes and confirm their effect before work starts.
Your project team should maintain a clear record of decisions, assets, approvals, open issues, and launch tasks. A documented process reduces confusion and gives every participant the project reference. Good governance does not replace strong UX, design, development, or QA. It gives each specialist requirements and gives you better control over the result.
Frequently Asked Questions
Can a website redesign affect SEO?
Yes. A redesign can affect SEO when URLs, content, navigation, redirects, metadata, or indexing settings change. Protect valuable pages, map old URLs to new destinations, prepare redirects, preserve useful content, and test crawlability before launch.
Does a website redesign include development?
Yes, a redesign can include development, but the scope depends on the project agreement. A complete service can cover discovery, UX, UI, frontend development, CMS integration, testing, and launch. Some projects include strategy and design only.
Should content be prepared before design?
Yes. Define key messages, content hierarchy, page goals, and approximate copy volume before detailed design begins. Final copy can change during the project, but a clear content structure helps your team create accurate layouts and reduces late revisions.
How long does a website redesign take?
A focused redesign usually takes 4 to 6 weeks. A small custom marketing website can take 6 to 8 weeks, while corporate or SaaS projects often take 8 to 12 weeks. Complex enterprise platforms may require 4 months or more.